
Four fly casts for drag-free presentations
You cast the fly beautifully and accurately in the direction of a feeding trout. As the fly drifts downstream, first the fly line and then the leader, begin to straighten. The line then draws tight and the fly skates unnaturally across the surface, just shy of the target. Best-case-scenario, the cast is over and you’ll try again. Worst case? A spooked fish.
This is what is commonly called “drag” and, in all but a few specific situations, it’s the antithesis of a good presentation. When dry-fly fishing, the fly must come to the trout as naturally as possible. A “drag-free drift” is when the fly floats gently downstream without giving the trout any clue that it is attached to the leader and fly line.
I often see anglers allow the line to land nearly straight and then quickly feed out line, or mend, to extend their drift. This usually results in unnecessary disturbance on the surface and a less-than-perfect drift. This works sometimes, but the best drifts come from the slack you put in the line and leader before it hits the water.
There are a variety of slackline casts, but the four I cover here are the most useful for a wide range of fishing situations.
As with any cast, these slackline casts require a solid casting stroke and good timing. One thing that the following techniques have in common is that you put slack into the line after the stop on the forward cast.
While it is certainly possible to make slackline casts with a sidearm stroke, casting in more of a vertical plane gives you more time to perform the adjustments in a relaxed manner, and with greater accuracy.
Reach Cast


Practice Drill.
Place a target directly in front of you at 40 feet. Next, place another target 10 feet in front of you but off to the side. Make your cast, placing the line around the target. Keep moving the target farther to the side and practice this in both directions to be ready for fishing either side of the stream.
When presenting the fly across-current, the fly line and leader must land upstream of the fly. If you were to cast the line directly across-stream with a straight line, the middle of the fly line would quickly form a downstream bow, or bend, as it heads downstream and will pull the fly behind it. A reach cast counteracts this because it places the line upstream of the leader and fly.
As with all casts, the first order of business is to make your cast in the direction of the target, allowing the line to unroll at eye level. At the end of the stroke, rotate your upper body, extending your arm upstream, and then smoothly lower the fly rod tip to the surface.
The distance that you move the rod tip determines the amount of extra line you place upstream. If you would like to add even more line, simply let the line slip through your fingers as you move the rod tip.
The speed of your forward stroke and the severity of your movements after the stop determine the shape that the line makes on the surface. Brisk movements result in a V-shape line on the water, while a lazy reach-and-lower forms a rounded C-shape.
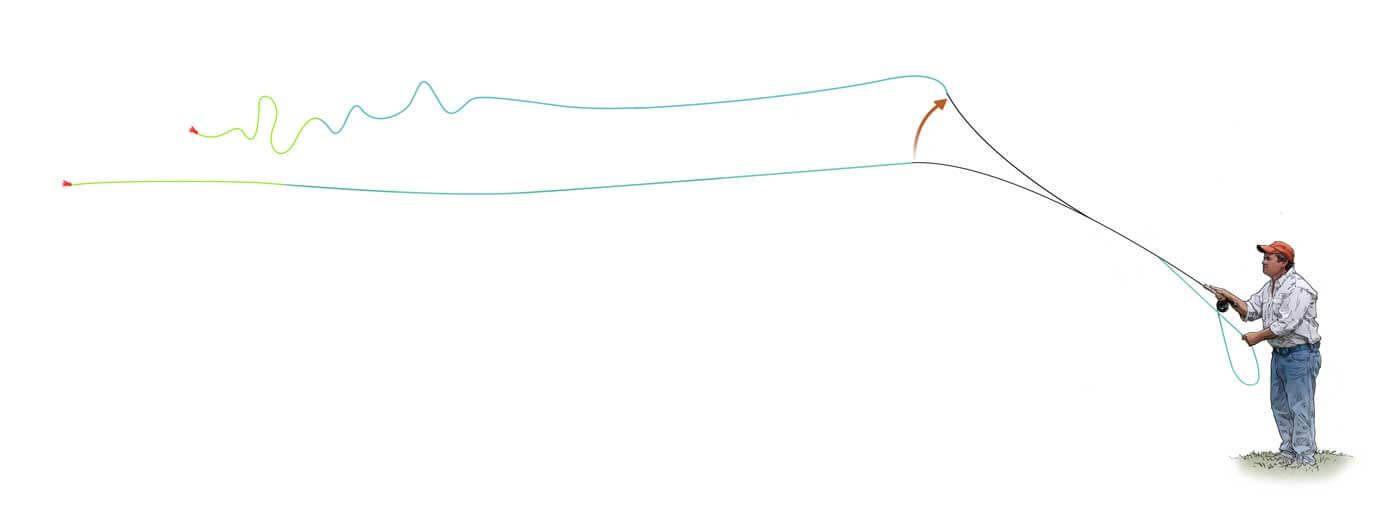
Wiggle Cast

Practice Drill.
Stretch out a measuring tape and place three soccer cones or other targets in a straight line at 10-foot intervals. Make your cast directly at the end cone and, after the stop on the forward cast, wiggle your hand as you lower the rod tip to the ground. Try to zigzag the line between the cones, or maybe just around one of them. Now vary the size of the wiggles and practice both right-to-left and left-to-right.
The serpentine or “wiggle cast” is perhaps the most versatile of all the slackline casts. Not only is it a great choice for adding length to a drag-free drift—when casting downstream—it also enables you to go around obstacles such as rocks and stumps.
Fly line has considerable weight and mass, which gives us the opportunity to shape and sculpt it however we like. It’s the greatest advantage of fly tackle over conventional spinning tackle, so we may as well use it.
Like the reach cast, the wiggle cast begins at the end of the forward stroke. Make your cast as you normally would, making sure to stop the rod so that the line straightens out at eye level. After the stop, slowly lower the rod tip to the surface, adding side-to side “wiggles” on your way down. From a quiver to a large wag, whatever notion you make with your hand and wrist will be reflected in the line.
It is important to stop the rod in an upright position to give yourself plenty of time, otherwise you aren’t giving yourself much “wiggle room”.
The sooner you wiggle after the stop, the farther your wiggles will extend along the body of the line. If you wiggle at the last moment, the S-curves in the line will appear only directly in front of you. Remember that a fly rod is a very long lever, and a little bit of movement goes a long way.
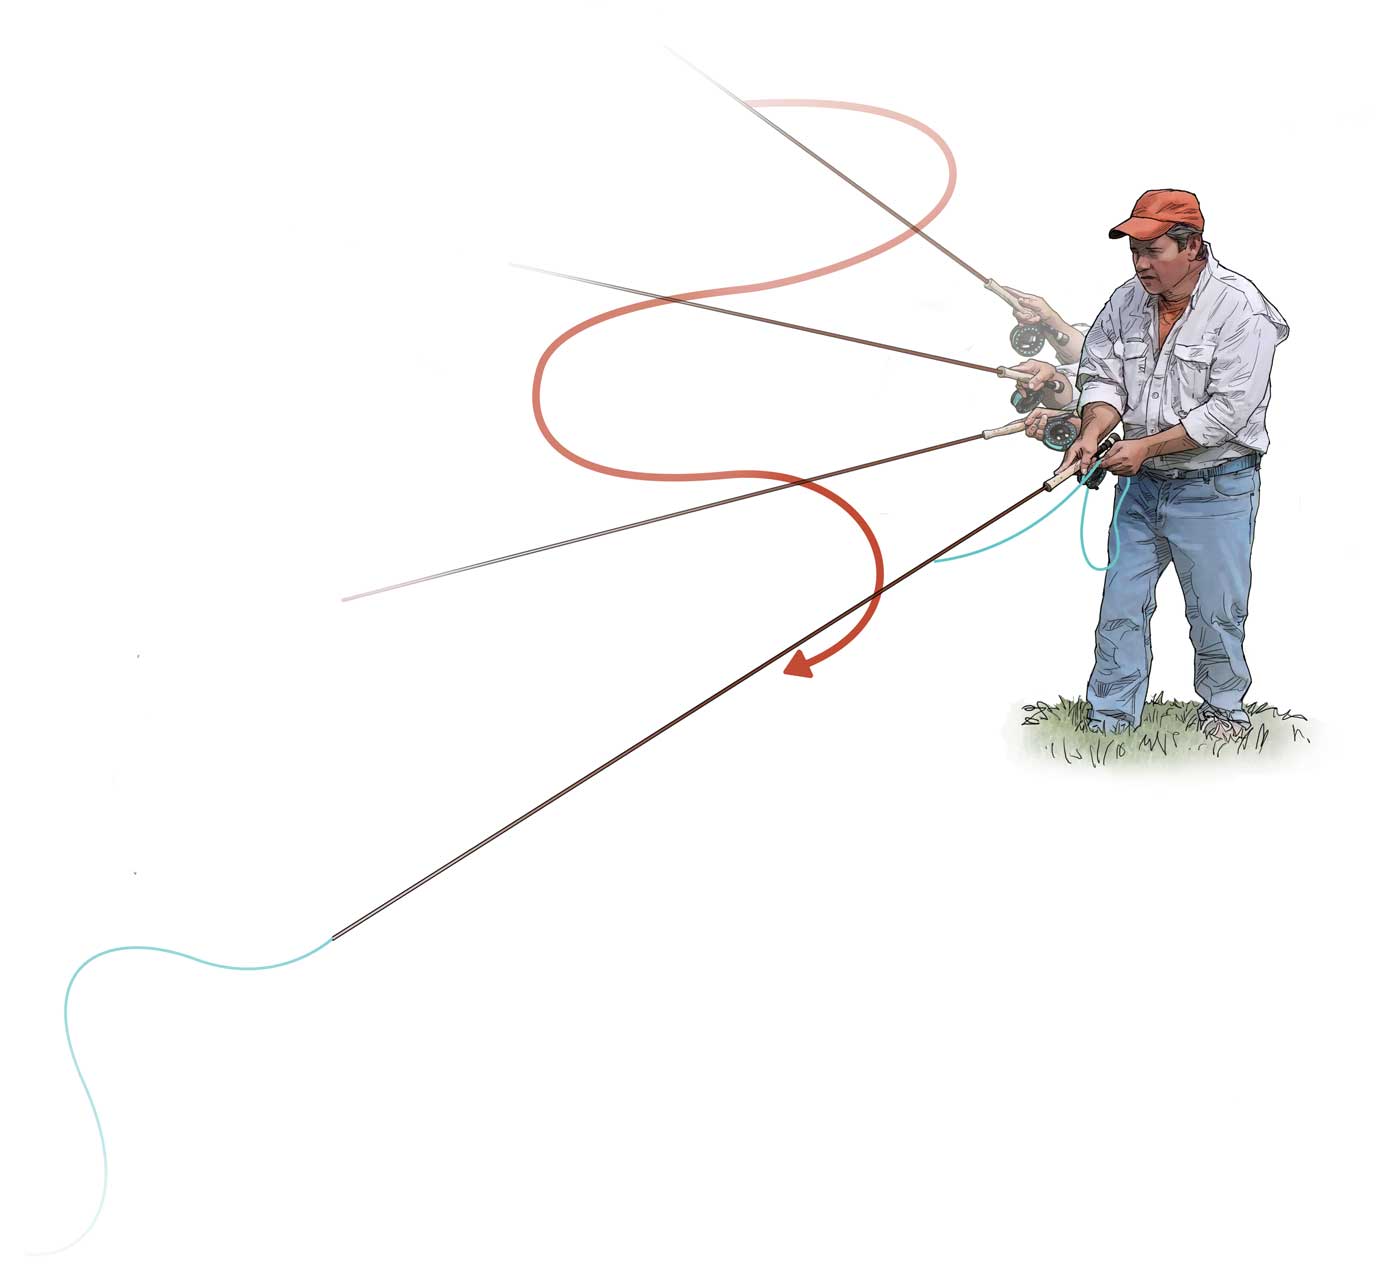
Shock Cast


Practice Drill.
Place targets in a line at 30 and 40 feet. First make a straight cast to the 40-foot cone. Then make another cast and “shock” the rod and line. How far back did the line recoil? Two feet? Ten feet? Remember that the end cone represents the end of the drift. Practice this until you are comfortable and confident in judging distances of both the outstretched line and the “shock value”. Developing good slackline casting skills will not only result in more hook-ups, but practicing and perfecting them will make you a better caster in general.
The overpowered or shock cast is on of my favorites because it is the simplest and most exacting of all the slackline casts. This cast is based on releasing more power into the line than is necessary to unroll it.
Start the cast as you normally would, adding a little extra hand speed to both the backward and forward strokes.
On the final delivery, stop the rod briskly or ever pull back a little bit at the last second, so that the line unrolls in the air and then recoils slightly. You will feel a bump when the line reaches its end.
You can also make this cast with some excess line in your hands, and after the stop and shock, let the line slip through your fingers to feed extra slack into the system. The line should fall to the water in relaxed waves, adding distance to a frag-free drift.
If you use this same ”shock” technique with a sidearm cast you can develop a very dramatic curve cast.
Parachute Cast

Practice Drill.
Practicing the parachute cast is much like practicing the shock cast, in that you benefit greatly from knowing just how much slack line you can introduce and still hit your target. Make a cast at 40 feet straight out. Now, with the same length of line, make parachute casts aimed higher and higher, and take notice of how much slack you can add. Experiment by trying to contain the waves only in the leader, as well as in both the leader and fly line.
The parachute cast, sometimes called the pile, stack, or tower cast, gives perhaps the gentlest slackline presentation of all. The S-curve in the line is more subtle than, say, the wiggle cast, and the fly lands very gently.
Develop this cast by driving the line in an upward trajectory and then quickly dropping your rod tip, pulling the fly line toward the water. This causes the line to fall to the surface in relaxed waves—much like a parachute after the skydiver lands on the ground.
As with all casts, the fly line and leader unroll best when the fly travels in a straight path to the target. In the case of the parachute cast, the trajectory is upward, so the backcast must straighten close to the surface.
The easiest way to achieve this is to simply make a sidearm backcast, and as the line straightens behind you, make an upward-angle forward stroke. You may shoot some line to lengthen the cast, but be sure not to overpower the forward stroke.
As soon as the line straightens in front and above you, smoothly lower your rod tip to the surface and let the line, leader, and fly fall softly. The belly of the fly line should fall to the water first, followed by the tip, the leader, your tippet, and finally the fly.
Author

Joe Mahler is one of the USA's leading fly casting instructors and author and illustrator of “Essential Knots & Rigs for Trout” and “Essential Knots & Rigs for Salt Water”. You can Book a fly casting lesson with Joe via his website here


